We have all experienced it… that feeling of dread when, after a long summer day of outdoor activities, we retire to our home and happen to find an ugly little blood-sucking parasite attached to our body. They can be hiding anywhere from our legs to the top of our head, and it is quite a violating experience. Ticks are pretty scary and they carry diseases that could be harmful to you and your pets. It is important to learn how to remove a tick safely, which keeps the risk of infection to a minimum.
Ticks are biologically engineered to grab hold of their “host” and dig in for a long meal. This makes them difficult to remove. The most important tool for a proper tick detachment is a good pair of finely tipped tweezers. While there are instruments on the market specifically designed to remove these parasites, a trusty pair of tweezers will do just fine in most cases. This tool is essential because you always want to avoid pulling a tick off by its body, which when crushed can force dangerous bacteria into your pet’s bloodstream or onto your fingers.
The following is a quick and easy, step by step guide on how to remove a tick properly:
1. Do not resort to home remedies such as alcohol or a hot match head that claim to make the tick back out or let go. In reality, these tricks may lead to the tick expelling more infected fluids into the animal it is attached to.
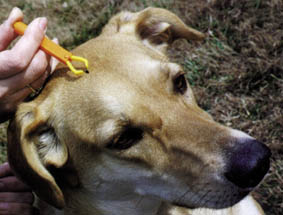
2. Use tweezers to grab the tick by the head as close to the pet’s skin as you possibly can. Never grab a tick by the body.
3. Pull the tick out in a steady firm motion directly off and not at an angle. Avoid jerking quickly or twisting the tick.
4. After you have removed the parasite, drop it into a small container of alcohol. This will kill it and prevent it from doing any more harm. Other methods, such as flushing it, do not actually kill it.
5. Clean the attachment site with any disinfectant. It is also a good idea to use a standard antibiotic cream or gel after cleaning.
6. Thoroughly wash and disinfect your hands.
After the tick has been successfully removed using the safe method above, it is not unlikely that a small welt or skin reaction to show up along with some slight irritation at the site. This is caused by the caustic and destructive tick saliva and is not a result of the head or some other remnant of the tick being left in under the skin. A tick’s head will rarely stay in if it has been removed properly so this should not be a major concern.
 |
During the summer months, tick activity increases as does the amount of time pets and their owners stay outdoors. Chances are that at some point you will discover one of these ugly little creatures on your pet pal or yourself. In either case it is very important to be familiar with how to remove a tick while avoiding some of the myths that could make things worse. |
| Having a distaste for ticks since childhood when he noticed one on his leg after a hike in the woods, Russ Barker set out to inform you about how to remove a tick in the safest way. Russ is a habitual blogger for DogTagArt.com, whose mission is to educate the masses concerning the importance of their pets having pet ID tags with accurate information. Any pet is much more likely to be returned safely home when lost with proper identification and Dog Tag Art's custom dog tags allow pet parents to be creative while keeping their treasured pals safe. |  |